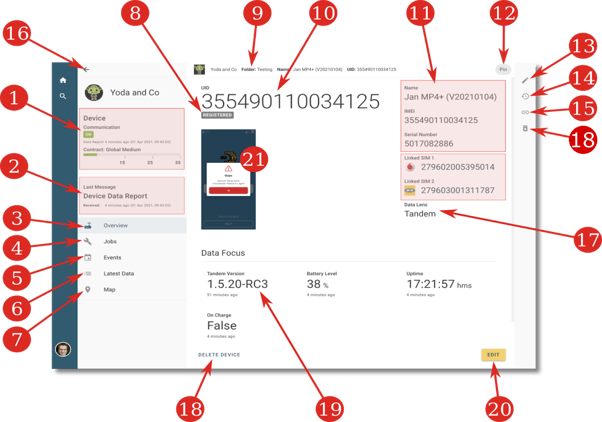
View device details
The device detail view is where you interact with a single device. Here you get a quick overview of the device's state, configuration, and performance.

- Communication State. This block of information displays the device's current communication state. If the device has an associated Communications contract, this block will show a progress bar type display to give you a quick view of the online/offline status of the device. See here for more information.
- Last message block. This information block shows you information about the most recent message the system received from the device.
- Overview. This menu item brings you back to the current device overview page, as shown in the image above.
- Jobs. Navigate to a list of the last 1000 jobs sent to the device. Here you will also be able to issue commands to send to this particular device. See Device Command View.
- Events. Navigate to a list of the last 1000 events that the device generated. See Device Event View.
- Latest Data. Navigate to a page where you will find the latest data reported by the device. On this page, you can filter the data according to the Data Lens associated with the device. See Device Latest Data View for more.
- Map. Navigate to a map showing you the location of the device. The map will attempt to plot the device's position using the latitude and longitude reported by its GPS. See Device Map View for more information.
- Device Life-Cycle state. This badge indicates the life-cycle of the device. When first created, the life-cycle will be "Created" and will change to "Registered" once the physical device has successfully registered itself with the system.
- Context Information. It shows you the company and folder of the device you are viewing.
- Main Identity display. The most prominent way of identifying the device to the user. The value displayed here can be set as a customisation on the company and could be the IMEI, the UID, or the device's name.
- Secondary identification. Here is all the other identifying information for this device that is displayed if available. It may include the IMEI, the UID, the serial number, a human-readable name, or a description.
- Dashboard Pin. With this slider, you pin a device to your dashboard. When pinned, your dashboard will display the focussed data (as defined by the data lens) for your device, as well as its communication state and some other information. You can thus quickly see the device health on your dashboard and quickly click through to it.
- Edit Button. Change the meta-information about this device. You can associate the device with a data lens, a communication contract, a command model. You will also be able to change its name, IMEI, UID, and other information.
- Change History Button. The system keeps track of some significant changes made to a device. Show what changed when and who changed it. This Button gives you access to this change history for this device. See Tracking Edits for more information.
- SIM-Device Links. The system keeps track of the SIMs that had been in a device. You may also lock a SIM to this specific device. This Button gives you access to that functionality.
- Return Button. Return to your previous page.
- Data Lens Information. Information about the data lens associated with this device. Amongst other things, the data lens describes which information is displayed (19) on this landing page. See Data Lens for more information.
- Delete Button. Deleting a device removes it from the system.
- Focussed Data display. When a data lens is associated with a device, it may define some data as "In focus". These data elements are displayed as a mini-dashboard here on the device detail view. See Data Lens for more information.
- Edit Button. Change the meta-information about this device. You can associate the device with a data lens, a communication contract, a command model. You will also be able to change its name, IMEI, UID, and other information.
- Image or Screenshot. You can display a picture on a device. On some devices, you may ask it to take a screenshot and upload it to the system. The latest of those screenshots is displayed here.

