If your SIM or device is not connecting, follow this guide.
SIM is not connected.
If your SIM is not connected to the platform troubleshoot with these instructions to find out where the issue is and how to fix it.
Step 1: Verify the network signal.
Begin by confirming whether the area where the device is located has a network signal. If no network signal is available, you will need to ensure that the SIM card is within an area with coverage.
If the SIM has a signal, then proceed to the next step.
Step 2: Check the "Stop Cause" of the most recent session in the Session Record. (see the below figures)
To view the Stop Cause of a SIM, follow these steps:
- Choose the specific SIM you wish to examine from the SIM List View. This action will direct you to the SIM Detail View.
- While in the SIM Detail View, navigate to the Session Record tab.
- Locate the Stop Cause information under Session History.
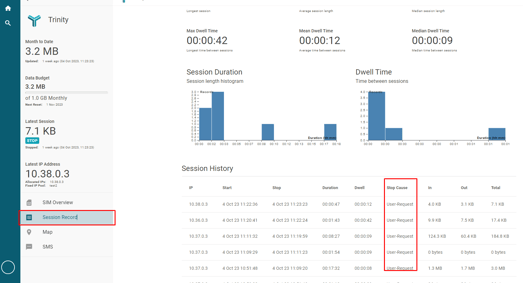
Understanding the Stop Cause will provide valuable insights into the SIM issue and assist you in addressing it in the future. Additionally, it will aid the support team in comprehending the issue should you need to reach out to them for assistance.
Potential Stop Causes, their meanings, and steps to reconnect your SIM:
- Idle Timeout – This occurs when the device either fails to send data to the server or when the server fails to communicate with the device.
- Action to Take: Verify SIM data, confirm network signal, assess device status, and ensure server availability.
- User Request – When there is an activity causing the device to reboot itself.
- Action to Take: Examine SIM data, inspect on-site power issues, and check server status.
- Lost Service – Indicates that the network operator couldn't establish a connection or the network is currently unavailable.
- Action to Take: Investigate power-related problems in the area and assess network availability.
- Session Timeout –This signifies that the customer server terminated the connection due to inactivity.
- Action to Take: Verify that the SIM has not exhausted its allocated data budget and has not been suspended.
If the problem persists, proceed to the next step:
Step 3: Check the status of the SIM.
The activation state of the SIM card is conveyed through its status, which can be categorized as follows:
- Activated -The SIM is operational and functioning normally.
- Hard Suspended - The SIM has been intentionally suspended by manual intervention.
- Soft Suspend - The SIM has reached its allocated data limit and has been automatically suspended.
- Pending deletion - Someone has initiated the process to remove the SIM from the system.
Note: To access the Change History, which is located in the right panel of the SIM, you can view information about when the status was modified and who made the changes.
You can view the status of a SIM in both the SIM List View and the SIM Detail View. (see figure below)
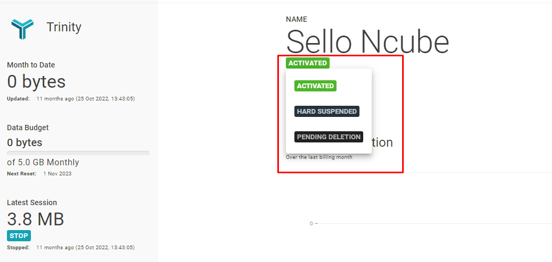
If the status indicates "Activated" it means the SIM is currently connected. If in your case, the issue is different, please proceed to the next step:
Action to Take: If the SIM status is "Hard Suspended".
- Choose the status to reveal all available options.
- Select “Activated”.
Action to Take: If the SIM status is "Pending Deletion".
- If you have the appropriate authorization/ permission, you can then restore the SIM from deletion.
Action to Take: If SIM says “Soft Suspended”.
- If you possess the necessary permissions, proceed to carry out a data top-up for the SIM.
SIM card is Activated but not connected to the internet:
If the appropriate action has been executed, and the status now indicates "Activated," yet it remains unconnected to the internet or the server, please move on to the subsequent section.
Step 1: SIM cards can be either enabled or disabled for internet access.
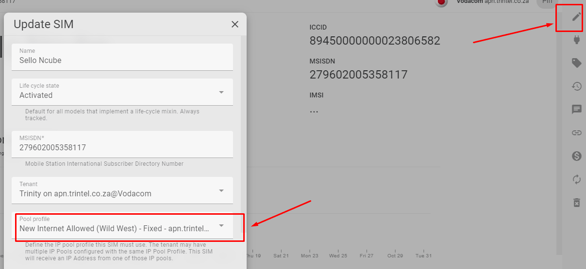
This means they can be configured to either have internet access or be restricted from it. To verify this:
- Access the SIM card you wish to examine via the SIM List View.
- Click the "Edit" button.
- Review the "Pool Profile" field, which will indicate whether this SIM has an IP that is permitted for internet access or not.
(See figure below)
Find out more about IP pool profiles here.
If the IP address is internet-enabled, yet the connection is still not functioning properly, please proceed to the next step.
Step 2: Ensure that Trinity's Access Point Name (APN) is correctly configured on the device.
To accomplish this, you will need to access the device directly. The procedure may differ depending on the specific device and Real-Time Operating System (RTOS) in use.
- If the associated APN is not Trinity's, you should enter the correct APN (apn.trintel.co.za).
- If the APN is correct and the device still cannot connect, verify the APN settings on the associated SIM.
- After making any necessary adjustments, be sure to restart the device.
Step 3: Check that Trinity’s APN is configured on your SIM.
If the APN is not configured on the SIM, the SIM will not be able to go online.
To check the SIM's APN:
- Access your SIM through the SIM List View.
- The configured APN for the selected SIM will be displayed in the top right corner, as shown below.
- If the SIM is not configured to the Trinity APN then contact support
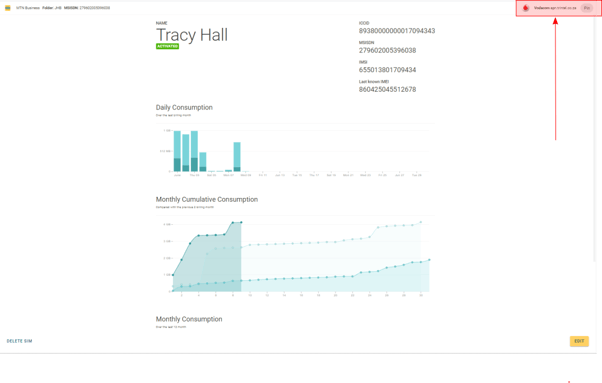
If the SIM is not configured to the Trinity APN then contact support.
If the APN has been configured and the problem persists, please proceed to the next step.
Step 4: Verify that the IP address of the physical interface connecting the device to the terminal matches the terminal's IP address.
To verify or modify this, you will need to access both the device and the terminal. If these IP addresses are the same, and the issue has not been resolved, then proceed to the next step.
Step 5: Confirm that the IP address assigned to the SIM is the same both on the device and within the Connect platform.
To verify the IP address of the SIM in Connect, follow these steps:
- Access the specific SIM you wish to check through the SIM List View.
- View the IP address in the left-hand panel, as illustrated in the image below.
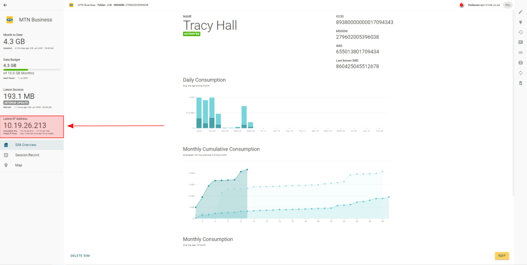
Action to Take: If the IP addresses do not match, or if they do match but the connection remains non-functional.
- Contact our Support team.
